Before we start: What is Microsoft Secure Score, in one paragraph
Microsoft Secure Score is a measurement tool within the Microsoft Defender portal that evaluates an organization’s security posture across identity, devices, apps, and data. It produces a single percentage score and a prioritised list of recommendations to improve it.
If you’ve just started a role as a Microsoft 365 Junior Administrator, a Tier 1 SOC Analyst, or an entry-level Cloud Security Engineer, chances are someone has already said the words “check our Microsoft Secure Score” at you. Maybe your manager. Maybe an auditor. Maybe a colleague asking if you can “just pull the number for the quarterly review”.
And chances are you opened the Microsoft Defender portal, found the Microsoft Secure Score page, looked at a bunch of cards and lists and numbers, and thought, okay, but what am I actually looking at, and how Microsoft Secure Score actually works?
You’re not the only ones, I was in the same boat, and it wasn’t easy. Nobody looks at Microsoft Secure Score for the first time and immediately understands all of it (like Microsoft Secure Score recommendations or Microsoft Secure Score calculation). It’s one of those Microsoft surfaces that’s genuinely simple once you know what each piece means, but completely confusing the first time. This post is a friendly guide that I wish someone had given me on my first day.
Together, we’ll open up a specific configuration, examine every field on the screen, and by the end, you’ll understand and know exactly what you’re seeing and what deserves your attention. No philosophy, no discussion of the GRC framework just yet—just the screen in front of you.
📌 This post is Part 1 of a series that builds up to something bigger, using Microsoft Secure Score as the engine of a compliance programme. If you’re curious about the bigger picture, the How We Built a Gold-Winning GRC Programme on Microsoft Secure Score — Series Introduction covers it. But you don’t need to read that first. Start here.
Getting to Microsoft Secure Score in 30 seconds
First, regarding navigation: since the site was recently moved, links in older blog posts may direct you to the wrong address, so please follow the instructions below:
- Open
https://security.microsoft.com(this is the Microsoft Defender portal) - In the left navigation, expand Exposure management
- Click Microsoft Secure Score
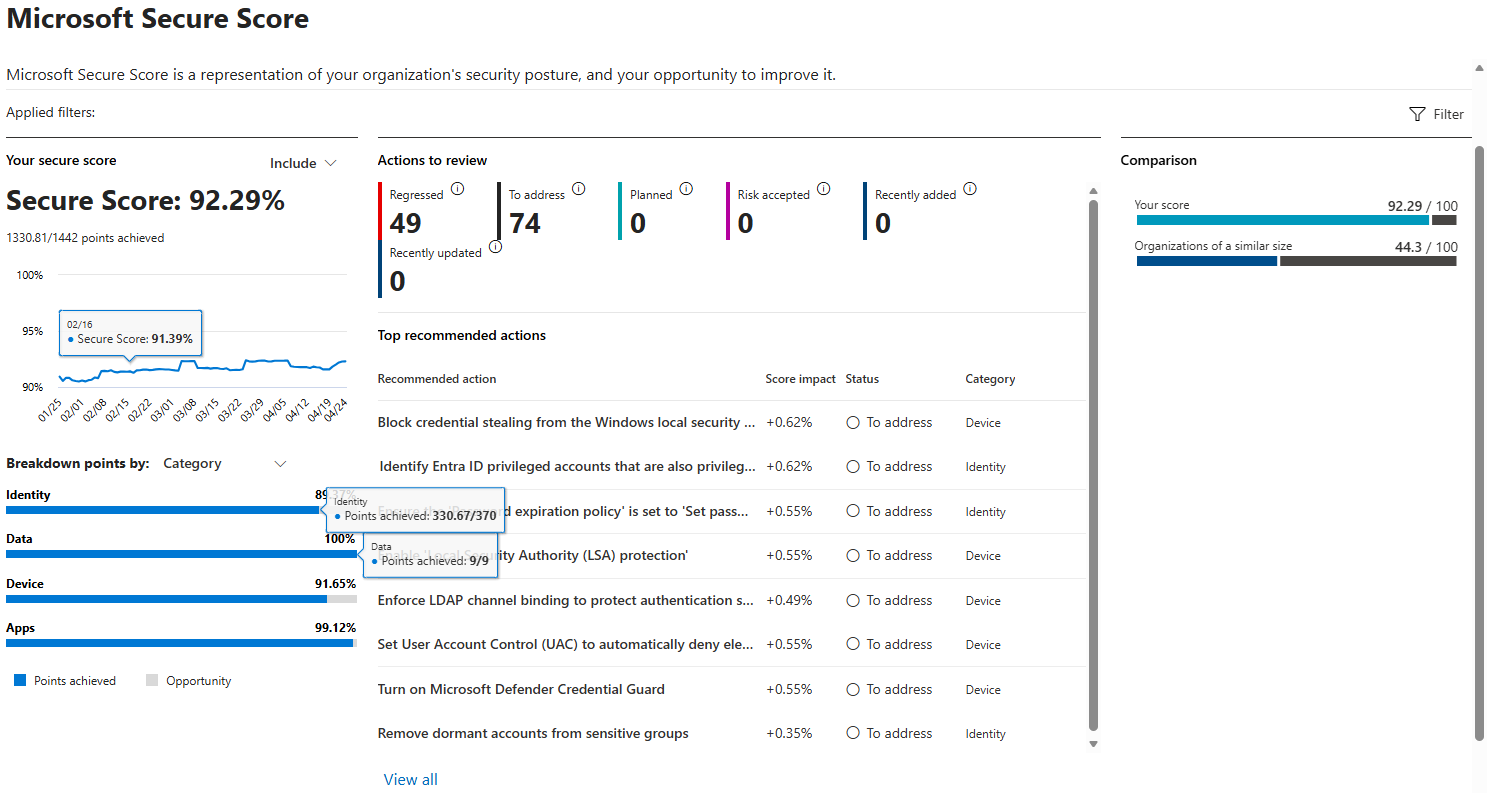
📷 Image 1 — The Microsoft Secure Score overview page.
What you’ll see on the overview page, from left to right:
- A big circular number: your current Secure Score as a percentage
- A historical trend graph: how the score has moved over time
- A Top actions to review: list, the recommendations Microsoft thinks would improve your score the most
- Comparison cards: how your score compares to tenants of similar size
Don’t worry about the overall number yet. We’re going to click into a single recommendation.
Opening your first recommendation
Click the Recommended actions tab at the top of the page. You’ll get a list of every Microsoft Secure Score recommendation, usually somewhere between 100 and 250 of them, depending on what products you’re licensed for.
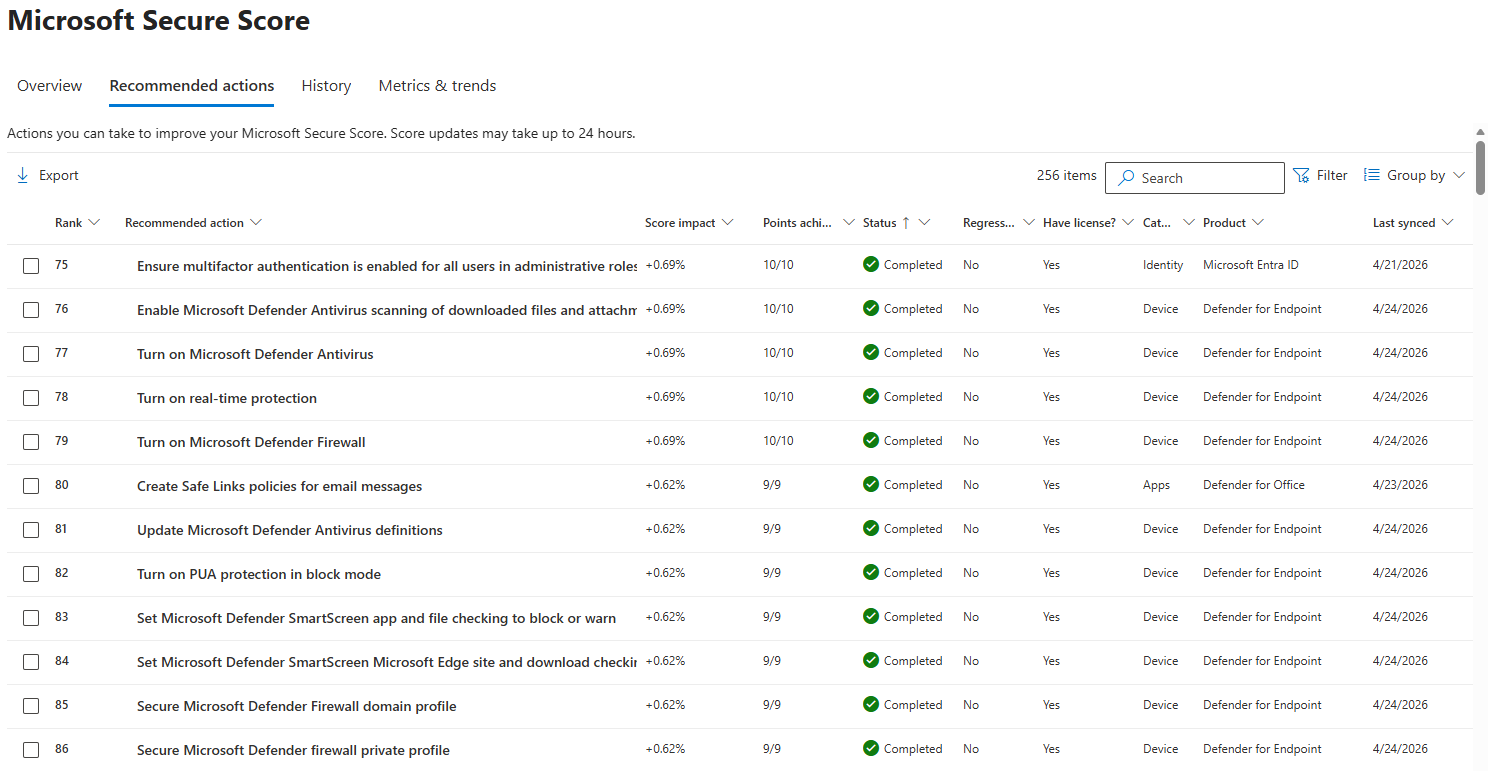
📷 Image 2 — The Recommended actions list.
For this walkthrough, pick a recommendation that sounds familiar. Good starting choices:
- “Require multifactor authentication for administrative roles”
- “Ensure all users can complete multifactor authentication”
- “Enable self-service password reset”
- “Enable audit log search”
Click on any one of them. A details pane opens on the right side of the screen. This is where we’ll spend the next 10 minutes or maybe more.
Every field on the recommendation details pane, explained
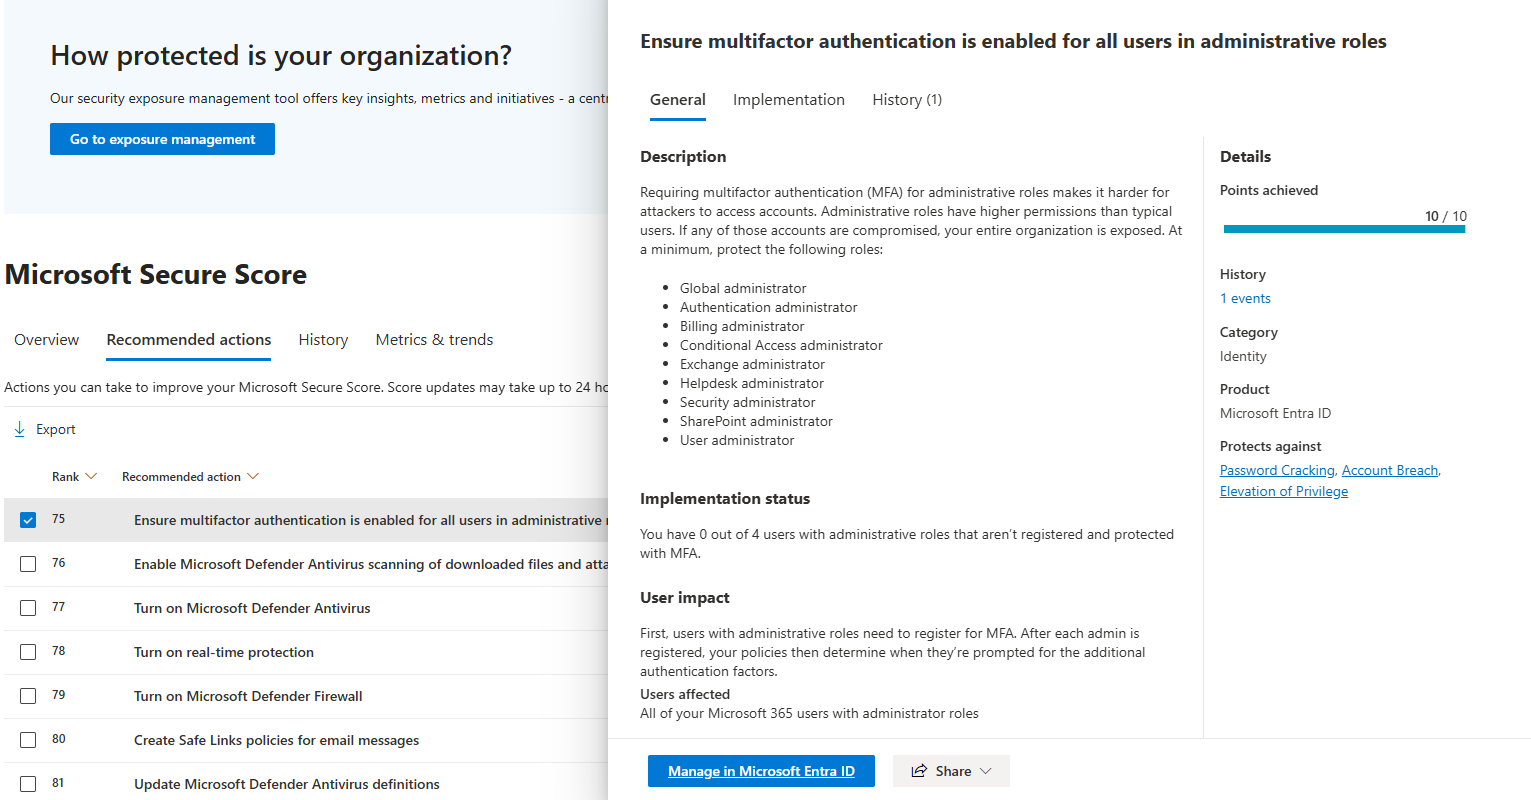
📷 Image 3 — A single recommendation details pane, fully expanded.
Let’s go through everything you see, top to bottom.
The title
Exactly what it sounds like, a short description of the control. Example: “Require multifactor authentication for administrative roles.”
What matters to notice: Microsoft wrote this title, not your organization. These titles are standardised across every Microsoft 365 tenant in the world. When you search for help on a specific recommendation, search for the exact title, you’ll find official Microsoft documentation and community posts that refer to it.
The product badge
A small icon indicating which of the four Microsoft products the suggestion comes from. Below are all four examples:
- Identity: from Microsoft Entra ID
- Data: from Microsoft 365 Defender for Office or Microsoft Purview
- Device: from Microsoft Defender for Endpoint
- Apps: from Microsoft Defender for Cloud Apps
Why this matters: if you don’t have a particular product licensed, you won’t see its recommendations. If you see very few Device recommendations, for example, it usually means Microsoft Defender for Endpoint isn’t deployed to your devices yet, not that you have no device problems.
The description
A paragraph from Microsoft explaining why this recommendation exists, what attack or risk it addresses, what happens if it’s not configured.
A small but useful tip: read this paragraph every time, even when the title seems obvious. The description often mentions specific attack techniques or compliance frameworks this control addresses. Understanding why a recommendation exists helps you defend it when someone pushes back on implementing it.
Implementation status
The values for the implementation status that you should pay attention to, are as follows:
- To address: the control isn’t configured (or not fully) in your tenant
- Planned: someone in your organization marked it as “we’re working on this”
- Risk accepted: someone decided not to implement it, and documented why
- Resolved through third party: you have a non-Microsoft tool doing this job
- Completed: Microsoft Secure Score confirms the control is configured
This is a field you update, not Microsoft. When Microsoft’s automated check confirms you’ve implemented the control, the status flips to Completed automatically. But if you plan to implement it later, or decide not to, you set it manually.
User impact
Microsoft’s assessment of how much friction implementing this recommendation will cause for your users. Typically Low, Moderate, or High.
This is an important piece of information that is often overlooked, but don’t do it. A recommendation labelled High user impact might still be worth implementing, but you should be prepared for user questions, support tickets, and possibly a communication plan. A Low user impact recommendation can usually be rolled out quietly.
Implementation cost
Microsoft’s rough estimate of how much work implementing this recommendation requires from your team. Again, Low, Moderate, or High. Useful when you’re prioritising a long list, start with low-cost, high-score-impact items.
Score impact
How many points your Secure Score will go up when this recommendation is completed. Usually something like +5.3 points or +12.7 points.
Notice: this is an absolute number, not a percentage. If your current score is 347 out of 600, and this recommendation is worth 10 points, implementing it takes you to 357 out of 600, which translates to a small percentage change.
Category
Broad groupings Microsoft uses to organise recommendations:
- Identity
- Data
- Device
- Apps
Same as the product badge, essentially. You’ll see the categories filtered at the top of the Recommended actions list so you can focus on one area at a time.
Tags
Small labels Microsoft applies to the recommendation, things like GDPR, NIST, CIS, ISO 27001. These are useful hints about compliance framework coverage but they’re not definitive control mappings. If you need real framework alignment, that lives in Microsoft Purview Compliance Manager, not here.
The “Implementation” tab
Below the summary, there’s usually a tab with step-by-step implementation instructions. For most recommendations, Microsoft has written a short, numbered guide that tells you exactly where to click to configure the control.
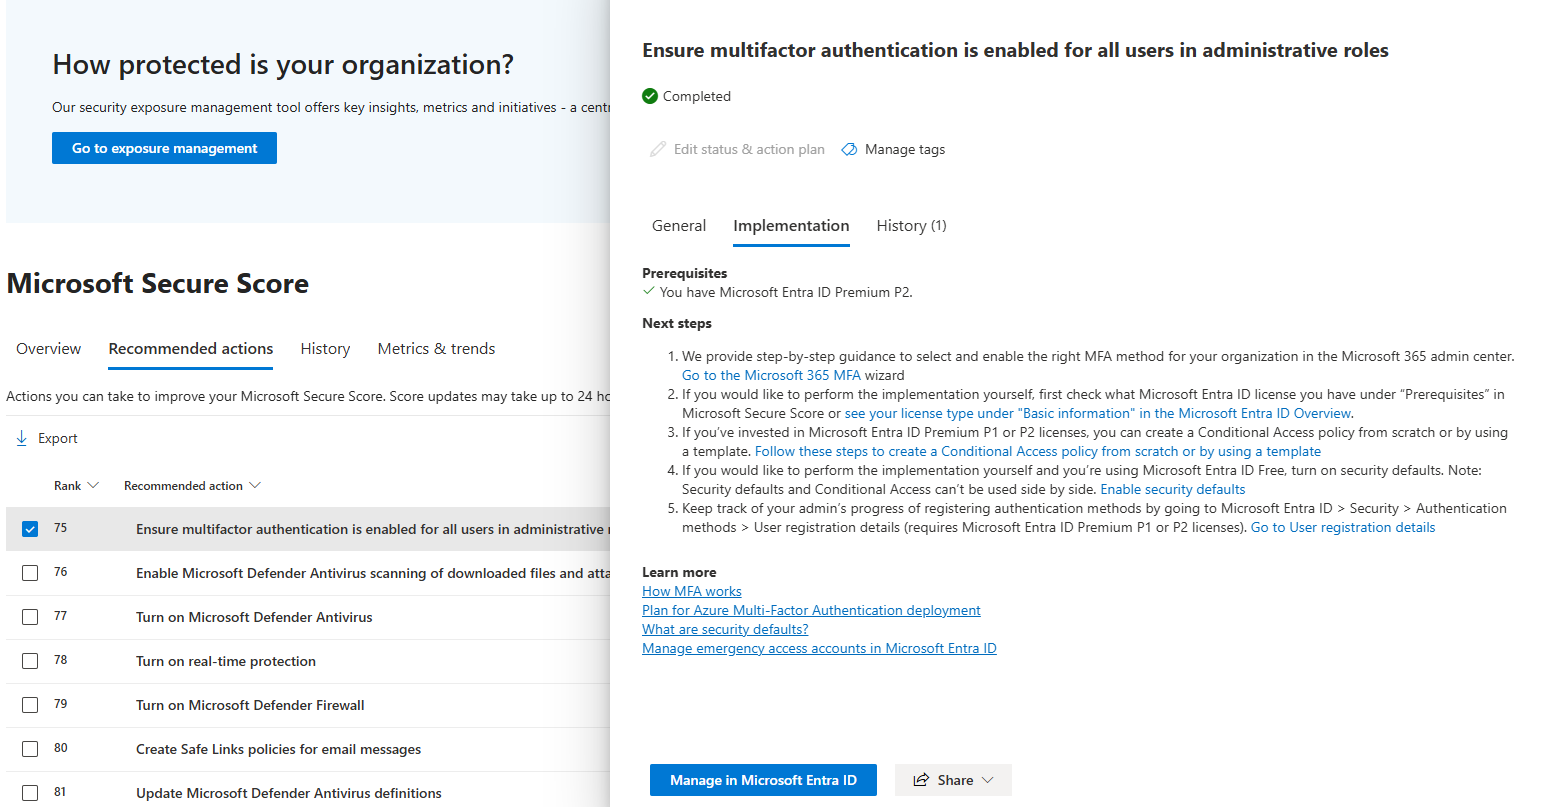
📷 Image 4 — The Implementation tab contents.
This is the single most useful thing in Microsoft Secure Score for someone new to the platform. Microsoft has essentially written the remediation documentation for you. Read it. Follow it. In many cases you’ll be able to implement the recommendation in 10 minutes without needing any other resource.
The “Details” or “Data” tab (when it exists)
For some recommendations, a second tab shows you the actual current state, how many users are affected, which ones, what specific settings are not configured. This is invaluable when you want to understand what “partial credit” looks like, sometimes a recommendation shows 60% implemented, and this tab tells you exactly which 40% is missing.
Four small habits that make this all easier
Some of these aren’t obvious, but they save you real time as you get comfortable with the platform.
Habit 1: Always read the title and the description
The title alone is often ambiguous. Two recommendations might have similar-sounding titles but address genuinely different controls. Reading the description (even just the first sentence) is the fastest way to avoid confusion.
Habit 2: Filter by category before prioritising
Instead of scrolling through 200 recommendations, filter by one category (Identity, for example) and prioritise within that group. Most security improvements cluster by category, fixing three or four Identity recommendations together is more efficient than hopping between areas.
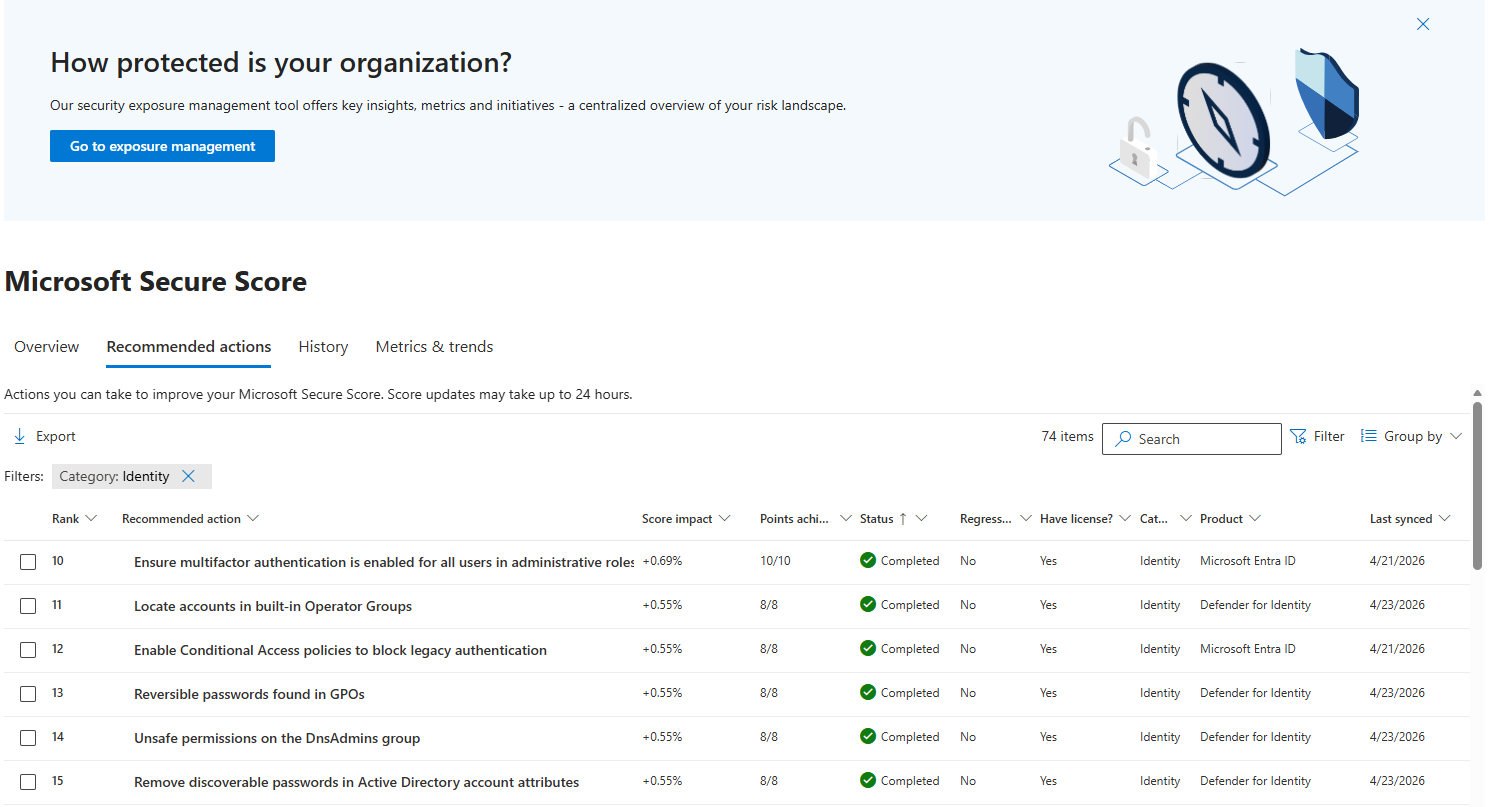
📷 Image 5 — The category filter applied to the Recommended actions list.
Habit 3: Sort by score impact, not by status
The default view is usually ranked by Microsoft’s own risk prioritisation, which is good, but when you’re new and want quick wins, sorting by Score impact (descending) shows you the highest-value recommendations first. Implementing two or three of those gives you a visible improvement in the overall number, which helps build confidence and momentum.
Habit 4: If a recommendation confuses you, search Microsoft Learn with the exact title
Copy the full title of the recommendation and paste it into Google with site:learn.microsoft.com. You’ll almost always find official Microsoft documentation explaining the control in more depth than the recommendation pane itself. This is your secret weapon, every recommendation maps to official docs.
What you can extract in under an hour
If you’re doing this for the first time today, here’s a reasonable 60-minute goal:
- Minutes 0–10: Navigate to Microsoft Secure Score, read the overview page, note your overall score.
- Minutes 10–25: Open five different recommendations from different categories. Read title, description, implementation status, and the Implementation tab for each. Don’t change anything.
- Minutes 25–40: Sort the full list by Score impact. Identify the top three highest-impact items that are currently “To address”.
- Minutes 40–55: For one of those three, read the Implementation tab carefully. Estimate whether you could do it safely today, or whether it needs planning.
- Minutes 55–60: Write down the three recommendations you identified. Ask your manager or senior colleague whether any of them are safe to implement.
This is a really useful exercise for the first day and probably for the whole day. You don’t need to implement anything yet. Just understanding what the page entails and being able to point out three or maybe four specific elements and say, “These three or four elements would boost the score faster if we implemented them,” puts you ahead of where most new professionals are on their first day.
What’s next
In Part 2 we zoom out from the single recommendation and look at where Microsoft Secure Score actually lives inside the Microsoft Defender portal and, more importantly, which Microsoft products feed it. You’ll see why your score is really a scoreboard reading configuration data from Microsoft Entra ID, Microsoft Defender for Endpoint, Microsoft Defender for Office 365, Microsoft Defender for Cloud Apps, and Microsoft Purview and you’ll learn how to trace a single score point back to the product that generated it.
🔗 For a ground-up tour of the Microsoft Defender ecosystem, the upcoming Microsoft Defender Demystified series will start there. Subscribe via LinkedIn to be notified when it drops.
Follow me on LinkedIn for new-post notifications.